Showing posts with label valve amps. Show all posts

Saturday, 24 January 2015

FIXED - Carlsbro PA 60

So, that Carlsbro PA 60 I took on from Mr. Foxen all that time ago is finally all fixed.


I got a big new resistor to replace the one that was smoking, wired everything up, put the valves in and tested it with the nearest convenient cab, which was a Peavey Deuce VT combo.

It crackled like Rice Krispies while Snap and Pop are on their hols. That was a shit metaphor but I'm keeping it, okay?

Anyway, fast forward past the eating lunch and doing the weekly shop and I lug the chassis upstairs to test it with my Orange OBC 115. And it appears that the thing actually works. Pots are a bit scratchy, but that's no biggie. It has a nice, warm clean sound and does not appear to drive the preamp by itself so that would need a booster. I ran my Retrovibe RVT-40 into it via my Nine of Swords Burial at Sea and it sounds pretty good running fuzz. I think with the right booster and right fuzz this amp could doom pretty hard.

Once it's been all cleaned up it will be put up for sale.

Saturday, 1 March 2014

Carlsbro PA60 Blues and Retrovibe RVT-40

The Carlsbro amp still isn't working. Having sorted the filter caps and the HT fuse (which it turns out needed to be slow-blow) the choke resistor (basically a great big resistor that sits between the power transformer and the rest of the circuit) is duff, smoking when the power's on and reading about twice as much as it is supposed to. Sigh.

I've also rewired my Retrovibe RV-4 to roughly approximate the wiring of a Peavey T-40 bass. Thus, Retrovibe RVT-40. I got all excited when I finished it and forgot to get a picture of the wiring, but here's the outside of the bass with classy-looking new knobs and a wee switch that does phasey stuff to the bridge pickup (in theory) and the T-40 wiring diagram.

Retrovibe RVT-40


I can't test that it works until tomorrow, on accout of it being quarter to eleven at night... but once it is tested I'll report back either in celebration or lamentation.

Sunday, 2 February 2014

Project: Carlsbro PA 60 Head

As mentioned previously Mr. Foxen of Ampstack has given me a Carlsbro PA 60 to work on.

Carlsbro 60 PA Front

From what I can tell from info-mining the internet this is a early-mid 70s model, probably a late Mk II. All other Mk IIs I've seen pictures of are point-to-point wired whereas this is on PCB, but I cannot find any reference to a Mk III so kind of assuming that at some point during the Mk II being in production it was changed to PCB construction.)

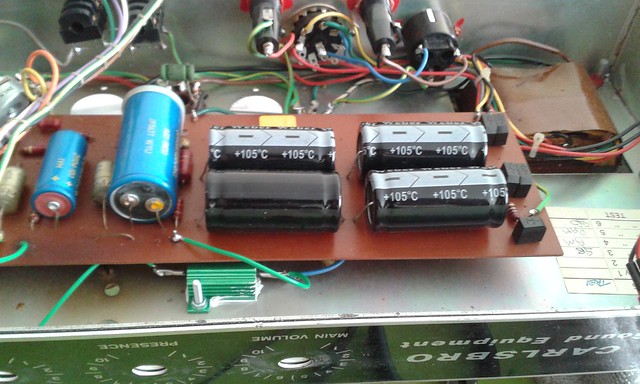
I have done initial solder refreshing and resistor testing. During the course of this testing I learned that sometimes resistors in circuit test at a lower ohmage than they are rated for and that by popping one end out of the board you can make sure they're sound. One of the resistors is duff (cheapo non-original, natch) plus the HT fuse has blown so that needs replacing. There was also a bodged in power cable which I've now removed.

Carlsbro PA 60 Guts

Pretty PCB

Next I'm going to clean up the valve sockets, pots, input jack, etc. and after that is powering up with no valves to check voltages.

Finally here is a bit of random human interest stuff. The amp was apparently built by Trev and tested by people who as far as I know exist only as initials.

Build and Inspection Label

Sunday, 26 January 2014

Things are afoot...

So, it appears to be all go here at Atomic Tangerine.

Not only am I soon to take on my second non-personal guitar upgrade, but I've taken on a project from Mr. Foxen.

The guitar upgrade is a simple electronics and pickups replacement for a dude who wants a bit more punch and versatility from his Epiphone SG. Pickups will come from IronGear.

The project from Mr. Foxen is a Carlsbro PA 60. Basically a 60 watt all valve amp head originally intended for PA use. Pretty much a win-win situation as I get to do more learning and Foxen gets more of his to-do pile finished.


Saturday, 18 January 2014

Peavey Road Master - It's Alive!!


I have finally fixed my Peavey Road Master. Following the diagnosis a while back I have got the resistors that I needed, and replaced them (along with putting smaller LEDs in the front panel so they don't catch so easily.


Resistors and LEDS


New Resistors 1


New Resistors 2

And Eric the Destroyer is back in action! After all that it was a couple of duff resistors. Less than 50p's worth of parts. Feel kind of silly that it's taken this long to sort a simple problem, but I am quite new at this, plus I get the good feelings that go with having sorted the issue.

Doubleplusgood is that I can take Eric to band practice next weekend.

Sunday, 20 October 2013

Peavey Roadmaster - The Saga Continues

Had the lid off the Roadmaster again yesterday. Cleaned the hell out of everything I thought needed cleaning. Refreshed all the solder joints. Lugged it back upstairs, plugged it in and... still fizzy, crappy overdrive on the lead channel.

Bah.

BUT!

It appears there might be a solution.

Turns out the effects loop might be causing a problem, as even though I never use it, it's still gonna get dirty and corroded and because of the way these things are wired that might cause signal loss. So as soon as the house is awake and caffeinated I will begin diagnosis and, hopefully, I might be able to fix this problem without taking the damn thing apart again.

Effects Loops: a Problem Waiting to Happen on Diabolical Devices

Sunday, 6 November 2011

Harley Benton GA5 head - Diagnosis

Took the GA5 to see Oli today, as he knows a bunch more about amps than I do and I was sorting and IDing a load of old (and I mean old) Warhammer stuff for him.

Turns out the problem is the power amp valve (EL84)... which it had occured to me it might be but without any other valves to test it with I couldn't be sure. Just glad it wasn't the power transformer really, as apparently those can be expensive.

So next thing is to get a new valve, I might replace the 12AX7 at the same time just so then it's full of all new valves. Oli tested it with Mullards, but I suspect those'll be a bit out of my price range.

Sunday, 30 October 2011

Harley Benton GA5 head - It's alive! IT'S ALI- oh..

Time for the chassis out, valves uncovered test.

All plugged in, volume all the way down, power on... valves warm up and are glowing nicely so I slowly roll up the volume. And I get a sound! Strum a bit, and I get some decent clean sound, roll up the tone and the sound gets a little bassier... so far so good. Strum a few more times... and with a sound I can best describe as a 'squeak' the amp stops working again.

Hmmm...

Next step is giving all the components a quick once over, visually and with multimeter, just to make sure everything's okay.

After that, it's time to get reading because if there's not anything that's obviously blown up/melted/phased out of reality I really have no idea what's happened.

Harley Benton GA5 head - Power up and begin troubleshooting

So, with the chassis back in the box (probably unneccessary, but I did it anyway) I took the amp upstairs, plugged it into my 4x12, switched it on and... nothing. Not a jot. Not even a hiss or hum.

I know it's not a problem with the speaker cable or cab, as I tested them using my Peavey Road Master head just now and they work fine. So what other possible issues could there be?

I don't think it's the EL84 (power amp valve) as that was glowing quite happily when I looked in the back of the head. No idea if the 12AX7 was glowing as it's in a metal tube thing so obviously I can't see it. Next power-on test will be chassis out, valves uncovered so I can see them both. In the mean time I'm going to have a closer look at all the connections within the amp and double double check that nothing's loose or broken. Also going to bodge some means of keeping that in-line fuse thingy closed in case that's a problem.

Saturday, 29 October 2011

Harley Benton GA5 head

Wow... turns out it's been nearly a month since I last updated this blog. That's mostly due to the fact I haven't really done any project stuff in that time. Which is lame as I still have that Swift LP copy to finish off.

Anyway, today I went to Bristol and picked up a non-working Harley Benton GA5 head for £10. The GA5 is basically an Epiphone Valve Junior with a tone control added and with the "Valve Junior" scraped off the PCB. I've had a look inside and can see no obvious problems (exploded components, loose wires, etc.) so tomorrow will power it up and see if it makes a noise. When I originally took the back off I noticed some kind of broken plastic thingy containing a fuse coming out of one of the transformers and thought that might be the problem but looking inside the wire doesn't connect to anything so I assme it's a bit of generic construction and whether it gets connected to anything depends on other factors (I suspect it'll be something to do with the country it's going to be used in).

Anyway, here are some pictures. It's not a bad looking little amp really. I've called it Bert.

Harley Benton GA5 Head

Inside the amp

Guts - main PCB

Guts - volume and tone stack

Quite pleased with this really... needs a whole bunch of work doing; even if it did work some of the components probably aren't as good as they could be and I'm not sure I'm keen on all those floating resistors.